The Library Manager is a graphical user interface tool that you use to define, build, and license manage libraries. A library is a group or set of related content collections that you, as a publisher, designate as a single shipping unit. The Library Manager interface enables you to define your library hierarchically with folders, sub folders, and content collection nodes the way you want your content to appear on your site.
The Library Manager has the functionality and capability to build libraries from existing content collections (built with other tools like ccBuild), or from content collections that you define and build within the Library Manager interface from various sources of content. You can also, with the Library Manager, implement license management and thus control access to your content. There are also various Library Manager tasks that you can run from the command line.
Note: You can use the Library Manager Console command-line utility
(LibMgr.Console.exe ) to perform some Library Manager tasks (such
as building and updating) and license management tasks. For instructions on
using LibMgr.Console, see Library Manager
Console Access.
This document introduces you to the Library Manager by:
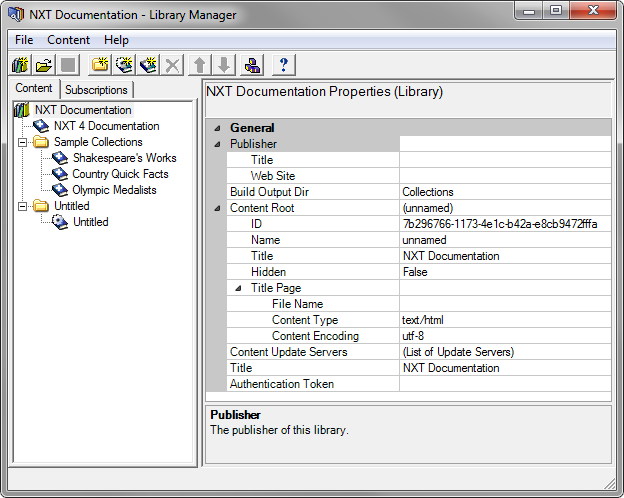
To launch the Library Manager application, Select Library Manager from the Windows Start menu. Figure 1 shows the Library Manager interface.
Figure 1. Library Manager Interface
The interface is divided into four main parts:
Note: What you see in the Library Manager interface depends on whether you purchased the NXT Builder product with license management or not.
When you first open the Library Manager, the Content and Subscriptions tabs and Properties pane are completely blank because, by default, the Library Manager does not automatically open a library upon launch. You can, however, change this default behavior by modifying your Library Manager preferences.
To open an existing library, thus populating the interface, select Open
from the File menu or click the  button
on the toolbar, then browse to an existing library. You can also select Recent
Libraries from the File menu if you have opened a library in the
Library Manager previously. However, if you want to
create a new library, select New from the same File menu
or click the
button
on the toolbar, then browse to an existing library. You can also select Recent
Libraries from the File menu if you have opened a library in the
Library Manager previously. However, if you want to
create a new library, select New from the same File menu
or click the  button on the tool
bar.
button on the tool
bar.
Note: You cannot use forward slashes (/) and backslashes (\) in the names of files, folders, and collections.
The Content tab displays all of the nodes (or objects) in your library down to the content collection node in a hierarchical tree structure. Each node in the content tree is a folder or content collection reference. You can also have content collection builders. Folder nodes can contain other content nodes. You can organize these nodes (folder and content collection) within this pane according to your content and business needs to create a hierarchy of content for your library. Table 1 is a list of nodes (icon, name, and description) that you can have in your content tree.
Table 1. Library Manager Nodes
| Icon | Name | Description |
|---|---|---|
| Library | The library node contains all folder and content collection nodes for a library. | |
| Folder | You can create structure within your library by using folder nodes and thus organize your content. | |
| Collection Builder | Collection builder nodes represent content collections that Library Manager builds and updates. These nodes also contain more properties and settings than do their collection reference counterparts because Library Manager uses more information to build the content collection. | |
| Collection Reference | Collection reference nodes represent existing content collections built by another process (i.e. ccBuild, another publisher's content collection, etc.) but you include and organize within your library. Library Manager does not do any builds or updates for these content collection nodes. To build and update these content collections, you must use a separate process. |
The Subscriptions tab displays all subscriptions that you have set up in the Library Manager for a particular library. Figure 2 shows the Subscriptions tab interface.
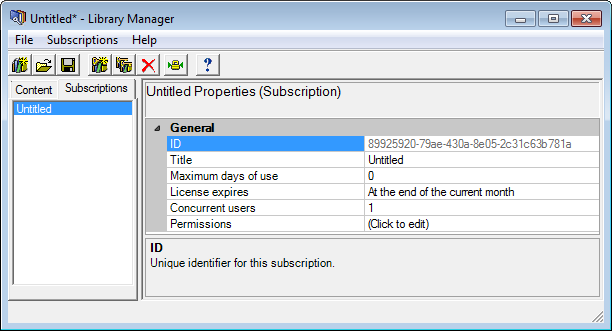
Figure 2. Library Manager Interface - Subscription Tab
When you first click on the Subscriptions tab, you will not see any subscriptions listed until you create them. You will also notice that when you click on the Subscriptions tab the Content menu changes to the Subscriptions menu and some of the toolbar button icons change to subscription related icons.
From this tab you are able to create and manage subscriptions for your content, as well as generate licenses for those subscriptions for your customers.
Whether you are on the Content tab or Subscription tab, the properties pane displays the properties of each respective node or subscription. Each node in the content tree has a list of General properties. Content builder nodes also have a list of properties specific to the type of repository where the source content resides.
Three properties are common to all nodes within the Library Manager: Name, ID, and Title. For any given node, NXT 4 defaults these values to ensure completeness. You can, and should, modify these defaults to fit your needs.
The File menu contains ten menu items:
The New menu item creates a new library.
The Open menu item opens an existing library. When you choose this menu item, the Library Manager provides a window where you can browse to the library you want to open.
The Save menu item saves changes you make to your library. Library Manager will prompt you to save upon close and exit. The Library Manager displays an asterisk (*) in the Library Manager title bar following the title of your library and before "- Library Manager" (Figure 1) if you have not saved the library since your last changes.
The Close menu item closes the current library that you have open in the Library Manager. This menu item will not close the Library Manager. When you close a library, the Library Manager will ask you if you want to save your work (if you have changes that have not been saved).
The Export Password List menu item produces a list of passwords of your content collections. This menu item is only available if you installed NXT Intranet or Offline Publisher products.
Provides a window for you to enter your License Generation Token. You must obtain a License Generation Token from Rocket Software before you can generate licenses for your library content. Once you receive your License Generation Token, choose this menu item to enable license generation. This feature is only available if you purchased a license-managed version of Builder.
The Generate License Report menu item produces a report of all the
licenses you, as a commercial publisher have generated in the previous period
(usually a calendar quarter). You send this report to Rocket according to
your publisher agreement. When you select this menu item, the Library Manager
will display a window for you to specify the location and name of this report.
The report is an XML document with a .rpt extension. This menu
item is only available if you installed NXT Intranet or Offline Publisher
products.
Note: You must also submit a separate Royalty Report that lists the publications you have sold in the previous period, the revenue generated, and the royalty due to Rocket.
The Preferences menu item displays a window that enables you to modify some of the Library Manager application settings. Figure 3 shows the Preferences window.
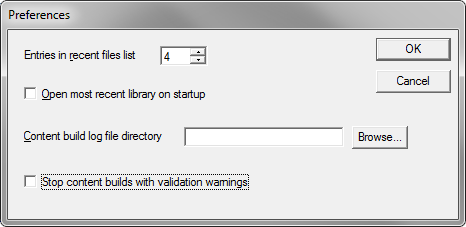
Figure 3. File Menu Preferences window
You can modify the following Library Manager preferences:
The Recent Libraries menu item opens the most recent libraries you have managed in the Library Manager. You see the results of this setting in the Recent Libraries pop-up menu under the File menu. You can set the number of recent libraries that this menu item displays in the Preferences window (Figure 3).
The Exit menu item completely closes down the Library Manager. When you exit, the Library Manager will ask you if you want to save your work (if you have changes that have not been saved).
The Content menu contains seven menu items:
The Add menu item adds a folder, content collection reference, or content collection builder node to your library.
The Remove menu item removes a node from your library.
Note: Removing a folder node from your library will also remove all of its contents (folder, collection reference, and collection builder nodes).
The Move Up menu item moves a node up the content tree. Up means moving a node above another sibling node, or, moving the node up the list of nodes to a different level in your library hierarchy.
The Move Down menu item moves a node down the content tree. Like up, down means moving the node below another sibling node, or, moving it down the list of nodes to a different level in your library hierarchy.
The Build Entire Library menu item builds your entire library. However, you do not need to build your entire library every time you run a build. You can opt to build a single content collection or a subtree of your library.
The Build Subtree menu item builds only a portion of your library, thus, reducing the build time. Once you have built your entire library the first time, unless you make major changes to your library its content, you will most likely use this menu item over building your entire library. Choosing to build your entire tree in this case rather than just part of your library, will not dramatically increase the build time if the content in other areas of your library has not changed.
The Start Collection Over menu item starts a content collection builder
(not reference) over by deleting the content collection and all update files
for that collection (.nxt and .upd files,
respectively), and removes all references of that collection and update files
in the library definition and install files. If you choose this menu item, the
Library Manager will display the warning and confirmation window in Figure 4.
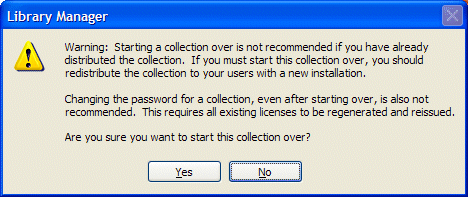
Figure 4. Start Collection Over Warning
Because this action removes the information about the content collection and update files from the library definition and install files, you must redeploy this collection (after you rebuild it) with a new install in order for the library install files of your end users to get updated.
The Subscriptions menu contains six options:
The Add Subscription menu item adds a new subscription for your library. You can add as many subscriptions for your library as necessary to fit your customers. Through this menu option you are able to define a subscription's scope and accessibility permissions.
The Duplicate menu item is only available after you add a subscription. It enables you to create an exact duplicate subscription of the subscription you select. If you need multiple subscriptions that are similar, you can (1) choose to duplicate an existing subscription, (2) select the new subscription in this list, and (3) modify its Properties fields as needed.
The Import menu item imports an NXT Subscription Definition file that you have exported and manually modified to further refine the subscription definition for that subscription. However, when you import a subscription, ensure that its ID does not match any existing subscriptions in the library.
Note: When you import a subscription, you must ensure that the ID of the imported subscription does not match any IDs of existing subscriptions. So, this means that if you have exported a subscription, manually modified it, and want to import it back into Library Manager, you must delete the original instance of the exported subscription and save the changes before you import the new version of the subscription.
The Export menu item exports a subscription definition to a file so you
can open it and manually to modify or refine the subscription with a text
editor. The resultant file is an XML formatted file with the .pubsd
extension, and is an NXT Subscription Definition file.
The Remove menu item enables you to delete an existing subscription from your library.
The Generate License menu item enables you to generate a license based on a subscription. You can generate multiple licenses for each subscription in your library. However, you must first enable license generation (from the File menu, select Enable License Generation and then get an authentication token for the library (see Generating Licenses for details).
The Help menu contains two options:
The Help Topics menu item accesses the help file for the Library Manager. Alternatively, you can press the F1 key for context-sensitive help while you are working in the application.
The About menu item displays the version of the Library Manager that you are running.
The toolbar provides shortcuts to menu items. It is tab-specific. When you have the Content tab selected, you will see one set of shortcuts. When you have the Subscriptions tab selected, you will see a different set of shortcuts.
A content bridge connects the Library Manager to your source content. This connection allows NXT to fully index the source content. The NXT 4 Product Suite includes three different content bridges so you can build content collections from various content repositories. Each of these content bridges has a unique set of properties that you need to provide so Library Manager can appropriately build the respective content collection. Table 2 lists and briefly describes each content bridge:
Table 2. NXT 4 Content Bridges
| Content Bridge | Description |
|---|---|
| File System | The File System content bridge (included with the NXT Builder software) enables you to build content collections from content stored on a file system. For information about the File System content bridge, see the Help file that is installed with NXT 4 Builder or this Documentation. |
| ODBC | The ODBC content bridge enables you to build content collections from data stored in any Open Database Connectivity compliant database. For information about the ODBC content bridge, see the Help file that is installed with the product or this Documentation. |
The Library Manager creates and manages various files. Some of these files are specifically for the Library Manager's use, and some are for other processes not inherent to the Library Manager, like library deployment and generating licenses on an e-commerce web site.
The Library Manager creates and stores information that enables it to display a
library content tree with all respective node properties in a library
definition file. This library definition file uses a .libdef extension.
This is the main file used by the Library Manager. In addition to this file,
the Library Manager also creates additional data files and folders for use with
other tools (although this is not required). Therefore, you must create a new
directory when creating a new library. Table 3 lists the different files that
the Library Manager creates and manages.
Table 3. Library Manager Files
| File Extension | File Type | Description |
|---|---|---|
.libdef |
Library definition file | Central data file for library information, containing the library properties and the content hierarchy of the library. This file references all of the other data files. Library Manager updates this file mostly when you choose Save from the File menu, and minimally when you perform a build. |
.libinst |
Library install file | Contains information about the content hierarchy of the library, including names and IDs for folders and content collections. Also includes information about the content updates available for each content collection in the library. The Library Installer uses this file to update the content on a client to the current version. Library Manager updates this file mostly when you perform a build, and minimally when you choose Save from the File menu. |
.ccprops |
Content collection configuration file | Configuration data for a single content collection.
Contains information necessary to build the content collection or a content
update. Library Manager updates this file when you choose Save from the
File menu. This and the .cbprops file reside together in the
Configurations folder of your library's output directory. |
.cbprops |
Content bridge configuration file | Configuration data for the content bridge for a single
content collection. Contains information specific to the content bridge
necessary for retrieving the source documents for the content collection.
Library Manager updates this file when you choose Save from the File
menu. This and the .ccprops file reside together in the Configurations
folder of your library's output directory. |
.pubsd |
Library subscription data file | Contains data for a single subscription for the library, including all of the properties for the subscription. Library Manager creates this file when you export a subscription. |
.publc |
NXT license file | Contains license information for the library or a subset of the library, including expiration, concurrent usage limits, and permissions allowed for the content. Can be a global license or a client-specific license. Library Manager generates this file whenever you generate a license. |
.rpt |
License Generation Report file | Contains information about all licenses you have generated over a given period. |
.pubpwd |
Content collection password list | Contains a list of all of the content collections in the library and their passwords. The Library Manager creates this file when you select Export Password List from the File menu. |
The Library Manager is a very powerful tool for building new and integrating existing content collections within a related unit that is called a library. The Library Manager, like ccBuild, enables you to create content collections from file system source content. However, unlike ccBuild, the Library Manager also enables you to create content collections from ODBC source content. The Library Manager also allows you to integrate existing content collections built with ccBuild or other processes within your libraries. Therefore, the Library Manager is a very flexible and robust content publishing application.
Copyright © 2006-2023, Rocket Software, Inc. All rights reserved.